Friday, April 24, 2009

Recipe Friday

Grandma Laymon's Sugar Cookies

These cookies definitely bring back childhood memories for me!! My Grandma Laymon would call the birthday kid and ask what kind of cookies they wanted for their birthday. We got to pick like 3 or 4 different kinds of cookies. It was really awesome! I always chose the sugar cookies. They are so yummy!!

Almond Sugar Cookies

Ingredients:

1 cup butter
2 cups sugar
2 eggs
1 tsp vanilla
1 tsp almond extract (if you don't have this, just add one more tsp of vanilla)
2 1/2 cups flour
1 tsp cream of tartar
1 tsp baking soda

Preheat oven to 400 degrees. Mix butter and sugar until well blended. Add eggs, vanilla, and almond extract. Mix all together. Slowly stir in flour, cream of tartar, and baking soda.

If your dough seems really sticky (which mine did), put in the freezer for about 30 minutes to one hour to harden. Roll in small balls and roll in sugar. My daughter and I added pink sprinkles to our sugar, and the cookies had some pink added to them. Put on baking sheet and bake about 10 mintues or golden. Makes 5 dozen cookies.

Wednesday, April 22, 2009

Embellished Clipboard

Here is this weeks Tutorial. A day late sorry. I took a clipboard shaped like a heart and painted it a rose color. I did a few coats until it got to the deisred darkness that I wanted. I used acrylic paint. Then I painted in the clip part. I just used markers and then after the paint was dry I decorated it with rub-ons.


Fabric Covered Take Out Box

Here another item that we have recently added to our store. It is a fabric covered take out box. It is covered with fabric inside and out and can be used as a darling little purse or as a cute gift box.

Furry Flip Flops


Sorry we have been slacking on the post this week and last. We will make it up to you. Last week was spring break for my kids and was barely home trying to keep them all entertained and this week, I am packing for a vacation. And Katie is pregnant and tired. So we apologize. We get back to normal within the next week or two. I just wanted to post a really cute project my friend taught me how to do. They are ordinary flip flops that you dress up with fun fur. She made a pari for each one my girls. Here is a pair that i just finished. Interested in puchasing some, look for them soon in our store.

Friday, April 10, 2009

Recipe Friday

I saw this recipe that my fabulous SIL put on this recipe blog and thought that I would share it with you!! And she got the recipe from Meal Planning Mommies

Bubble Pizza


Here is what you need:

Ingredients: 2 cups pizza cheese (or whatever cheese you have on hand), browned sausage (you can also use pepperoni, hamburger or bacon), 1 jar of pizza sauce, 2 tubes buttermilk biscuits.

Step #1: Brown and drain the meat.

Step #2: Cut the 2 tubes of biscuits into quarters.

Step #3: Put the biscuits into a bowl along with the jar of pizza sauce.

Step #4: Add the meat and any other toppings you may have.

Step #5: Mix it all together.

Step #6: Pour into a baking dish (ungreased).

Step #7: Bake at 350 degrees for 20 minutes.
Step #8: No, I didn't forget the cheese! After baking for 20 minutes, take it out and add your cheese. Now pop it back in the over for 10 more minutes.

Now you are finished! This is so yummy it is sure to please even the pickiest of eaters!

Cost of Meal- $5.00
Serves- 6 people
Cost per person- 75 cents per person

Pretty FRUGAL!

Thursday, April 9, 2009

My next project :)

When I made these bean bags for my kids, one of our awesome followers commented and wanted us to do a tutorial on a bean bag chair. I never thought of making a bean bag chair. So I went searching for a tutorial so I could make one!

My next big project is decorating my girls room. My husband is building bunk beds since we need as much room as possible since all three girls will be sharing a room. I want to do a Dr. Suess themed room and bean bags would be so fun in their room for them. They already love the LoveSac that we have. And I just got two 50% coupons and two 40% off coupons to Joann...I think I am going to use it to buy fabric for the three bean bags that I am making (might as well make one for baby on the way too). I found this awesome tutorial at Making It Fun. There are lots of cute ideas and tutorials on this site. Check it out!

I will be sure to post my three bean bags when I am finished making them...it might take about a month or after the baby is born :)

Picture from Making It Fun

Tuesday, April 7, 2009

Tutorial Tuesday

Cross Stitching Tutorial

I love to cross stitch but have had much time to do it lately. I decided to work on a cross stitch project that would only take a few hours to do. It is just lettering so for a counted cross stitch it is on the easy side. If you do not know what a counted cross stitch is, here is the definition: It is when there is no picture printed on the cross stitch fabric and you actually have to look at the example and count out how many stitches to do.

I know there directions are kind of hard to understand. It is easier to physically show then to say. Hopefully the pictures help.

1. First step is picking out what size hole fabric you want and getting a loop. There are lots of different size holes. The basic or average size hole you want is either 16 or 18 count. And all that means, is that the holes are bigger, the bigger the number. My fabric is on 18 count. The loop I am using is to hold the fabric taught so it is easier to work with. You can move it when you need to. For this project, I didn’t have to move my loop at all since it was big enough. They have loops in many different styles and sizes. I prefer wood only because sometime you can decorate them with ribbon after the cross stitch is finished and hang them on a wall


2. Before you put the loop on the fabric, you want to fold the fabric in half both ways to determine where you center is. The find your center on your pattern. That is your starting point.


3. You want to want to pull the needle up from the bottom left corner of the square until you have a little embroidery floss left, like ½ in. You need to hold that floss sturdy while you put the needle down through the top right corner to make ½ an “x”. In the back, the floss will start to make a loop as you pull it. Put the end of the floss inside the loop to secure it into place


4. If you have a bunch of stitches in a row, it is easier to do all ½ “x’s” going from left to right. The when you are going back to finish the “x” you go right bottom to left top


5. For lettering, sometimes it is easier to do individual x’s so that you are not pulling your floss to far in the back. You do not want to see the floss through the fabric.


6. When ending your letter, you just put your needle through a few of the stitches gently in the back and pull. This makes the floss secure.

7. When starting the next letter, you count out from your previous x and start there.

8. If you have to switch floss in the middle of a letter, you pull the floss through some of the stitches already in the back, and make a small knot when the floss is looping. It makes it nicer in the back.


And here is the final lettering.

Friday, April 3, 2009

Recipe Friday


GERMAN PANCAKES

4 tablespoon butter
1/2 cup evaporated milk
1/2 cup flour
4 eggs
dash salt

1. Preheat oven to 425 degrees. While oven is preheating, melt 4 tablespoon butter in 9-inch pie pan by putting it in the preheating oven.
2. In large bowl, using a wire whisk, beat together: 1/2 cup evaporated milk, 1/2 cup flour, 4 eggs, dash salt
3. Pour batter into 9x9 inch pie pan (or regualr pan) that has the melted butter. Put it back in the oven.
4. Bake for 10 minutes.
5. Serve with powdered sugar or syrup or both.

You can also double the recipe and split the batter into 2 pans. You know it is done when the sides have puffed up and are slightly brown. When pouring in the pans, you only want it to fill about 1/2 way because it will rise, especially on the sides as you can see in this picture I found. In our family, we cut it like a pie and then put the powdered sugar and syrup on it. Very Yummy.
**If you want to make it healthier you can substitute fat free evaporated milk and use egg beaters**

This was a big recipe in my family while growing up, You can have them for breakfast or dinner.

Thursday, April 2, 2009

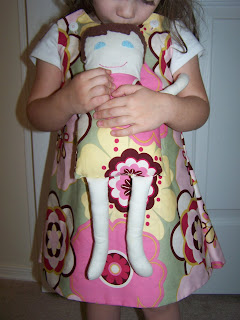
Little girl dress with matching doll

I just finished sewing a dress for my daughter and a doll that matches. My daughter loves that her doll matches her. Maybe I will make some for our shop...


Wednesday, April 1, 2009

Tutorial....Wednesday


Total slacker and a day late for Tuesday Tutorial, but I have been busy sewing and crafting! Be sure to check out our shop this week, we will be adding some cute new things :)

Dishtowel Potholder Apron for kids

My SIL made these adorable aprons for my kids and I wanted to make some of my own. They make such cute gifts for kids. Add a kid cookbook and a little wooden spoon, and you have a cute gift set!
The apron my SIL made


I bought my dishtowel and potholder at Target, they are easter and cute! I was not good about taking pictures while I was sewing...sorry!

First cut your dishtowel to the desired length that you want it. Then gather the top until it is the same length as the potholder.

Sew the dishtowel (where it is gathered), to the bottom of the potholder. Sew your ribbon onto the bottom of the potholder and the top of the dishtowel. Make sure to make the ribbon long enough to be able to tie around the child's waist.

On the top of the potholder, sew a piece of ribbon. This will go around the child's neck. Then on the back of the potholder, sew a little piece of velcro. On the other side of the ribbon (the one not attached to the potholder), attach the other piece of velcro.


And your done! EASY and FAST :)

Related Posts Plugin for WordPress, Blogger...