


I made this really cute paint can canister for my daughter to put her rexlace stuff in. It is little and light enought that she brings it in the car with her so she can work on making her keychains.
Sunday, March 29, 2009


Friday, March 20, 2009
Recipe Friday

These are easy to make and really good :)
Mini Cinnamon Muffins
Ingredients
1 1/2 cups all-purpose flour
1/2 cup plus 1/3 cup sugar, divided
1 tablespoon baking powder
2 teaspoons cinnamon, divided
1/2 teaspoon salt
1/4 teaspoon nutmeg
2/3 cup milk
1/3 cup vegetable oil
1 large egg, beaten
2 tablespoons butter, melted
1. Preheat oven to 400 degrees. Coat mini muffin pan with cooking spray. Combine flour, 1/2 cup sugar, baking powder, 1 teaspoon cinnamon, salt, and nutmeg in a large bowl; mix well. Combine milk, oil and egg in a medium bowl. Add milk mixture to flour mixture; stir until well blended.
2. Fill prepared muffin cups three-fourths full using about 1 tablespoon batter in each. Bake muffins until golden, about 15 minutes. Remove muffins from pan.
3. Combine remaining sugar and cinnamon in a custard cup or small bowl; blend until smooth. Dip tops of muffins into melted butter, then into sugar mixture. Cool completely on wire racks or serve warm.
Makes about 2 dozens muffins.
** Add 1/2 cup miniature chocolate chips to the batter before baking and omit the cinnamon in the sugar mixture used for the muffin tops. **
Tuesday, March 17, 2009
Quick and easy Gift
Rub-on Canister Gift
This tutorial is super easy but they make great gifts. The best part about why I like them is you can make them in about 5 min.
You will need the following:
1 glass jar, or canister
some ribbon
Rub-ons
Something to fill your jar up with (I chose candy)
1.You take the jar and decide what type of rub-on you want to use. I was making this for a neighbor friend so I chose a friend rub-on that I like
2. Cut around the rub-on that you will use. (I find that that is easier than trying to not get any of the other rub-ons on the project, because once a rub-on is on, it doesn't come off.)

3. Rub it on the place you want it. Make sure that you get all of it rubbed on, then slowly take it off to make sure that it all got rubbed on, if not, just lay it back down and rub it some more.

4. Fill up the canister or jar, add a ribbon and you can also add a cute tag as well. I had already made her a card so I didn't include a tag.
 There you go, Super cute, quick to make. (I did put a green ribbon around the canister under the top but I forgot to take the picture before I gave it to her.)
We have a winner :)
 We have our winner from our giveaway!!! With random number generator...#10 is the winner, which is AMY. Congratulations :) I will email you shortly to get your info so I can mail you the adorable Bianca doll.
For those of you who didn't win and just cannot live without these adorable handmade dolls ;), be sure to check out our etsy shop. I will be adding some more dolls soon!!
Wednesday, March 11, 2009
Fun kids crafts
Making your own finger paint
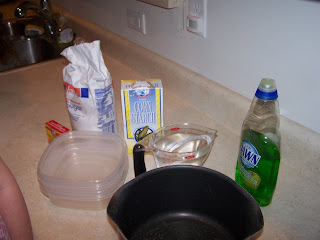
I came across this washable finger paint recipe and wanted to try it out. My kids loved helping me make it and then they enjoyed finger painting with it. It took about 10 minutes to make and it was very easy.
What you will need:
2 tbsp sugar
1/3 cup cornstarch
2 cups water
large sauce pan
1/4 cup dishwashing soap (Dawn)
food coloring
Directions:
In a large saucepan, combine the sugar, cornstarch, and water.
Bring mixture to a boil over medium heat (under adult supervision), stirring constantly until the mixture thickens into a smooth gel. Stir in the dishwashing soap.
Pour into individual containers.
Place food coloring in each container and mix while it is still warm.
Let cool, then store in glass containers (or other container a lid).
And use like finger paint.
 Our finished finger paints
 My girls finger painting

Making your own edible play dough
I love watching Jon and Kate plus Eight on TLC. The latest rerun that I saw was when Kate made this edible play dough for her kids. I wanted to try it out! I found the recipe for it here.
Girl Scout Peanut Butter Play Dough
1 cup Peanut Butter
1/2 cup Honey
2 cups powdered sugar
Mix all ingredients in a bowl, using your hands. Dough should feel soft and pliable. Form shapes and be creative!
Storage: When not using, MUST be stored in an airtight container.
I came across this washable finger paint recipe and wanted to try it out. My kids loved helping me make it and then they enjoyed finger painting with it. It took about 10 minutes to make and it was very easy.
What you will need:
2 tbsp sugar
1/3 cup cornstarch
2 cups water
large sauce pan
1/4 cup dishwashing soap (Dawn)
food coloring
Directions:
In a large saucepan, combine the sugar, cornstarch, and water.
Bring mixture to a boil over medium heat (under adult supervision), stirring constantly until the mixture thickens into a smooth gel. Stir in the dishwashing soap.
Pour into individual containers.
Place food coloring in each container and mix while it is still warm.
Let cool, then store in glass containers (or other container a lid).
And use like finger paint.
Everything you need
 Our finished finger paints
 My girls finger painting
Making your own edible play dough
I love watching Jon and Kate plus Eight on TLC. The latest rerun that I saw was when Kate made this edible play dough for her kids. I wanted to try it out! I found the recipe for it here.
Girl Scout Peanut Butter Play Dough
1 cup Peanut Butter
1/2 cup Honey
2 cups powdered sugar
Mix all ingredients in a bowl, using your hands. Dough should feel soft and pliable. Form shapes and be creative!
Storage: When not using, MUST be stored in an airtight container.
Tuesday, March 10, 2009
SITS Spring Fling Giveaway
SITS is hosting their first annual Spring Fling Givaway where all of the sitsas are doing giveaways!! So go check out all of the giveaways and the grand prizes!!
For our giveaway, we are giving away this adorable Bianca Doll.

 To enter our giveaway, leave a comment on this post for one entry. For one additional entry become a follower of our blog or subscribe to our blog. And for another additional entry, follow us on facebook.
The giveaway will end on Saturday, March 14th at midnight. Good luck!!!
Friday, March 6, 2009
Recipe Friday
I got this recipe from my sister and my family loves it. It is also great for leftovers and to freeze.
Taco Soup
Chicken (4 breasts or 6 tenderloins)
Boil with shallow water in a big pot until cooked and tender, chopping up slightly. Drain water.
Then add to the pot:
dash of salt
dash of garlic salt or powder
dash of onion powder or chopped onion
1 package of taco seasoning
1 can of diced tomatoes
1 can of corn, or frozen
1 can of refried beans
1 can of pork 'n beans
1 can of black beans (drained and rinsed)
1 can of pinto or kidney beans
1 package of dry ranch dressing
Stir everything together. Cook over medium heat until beans are soft and thick. Then put on low heat.
We like to serve with cheese, sour cream, and chips.
Tuesday, March 3, 2009
Painted Pot

I have recently been trying to find a cute pot to decorate to put my wooden letters in that I did last week. I had decided that though they are cute hanging on a wall, I had another idea in my head that I wanted to do. I finally found a pot even though it has some grooves on it. It did not turn out perfect, but I think that all handmade things show more personality if they are flawed. That is how you can see that they are handmade.
 2. Next I took my time trying to carefully adhere them where I wanted them. Since the pot has grooves, it was a bit harder to get the vinyl as smooth as I wanted.
 3.I picked out my acrylic paint and dabber and painted them like I would a stencil.

 4. I set it aside and let it dry for a few minutes and then carefully took off the vinyl. Now since the pot had grooves and I could not get the vinyl to lay as flat as I liked, I then had to go back with q-tips and clean up the outlines because some paint and gotten under the stencil and the lines were not as clean as I liked. I think I did an okay job. If I accidentally took too much off, I dipped the q-tip in the paint and gently dabbed it.
 5. I am going to let it dry overnight and them spray or coat with a clear coat so the paint is shiny.
1. I used my Cricut (many of you know I love this machine) and made templates with some vinyl that I had. I made the butterflies 3 in tall and the flowers 2 in.
2. Next I took my time trying to carefully adhere them where I wanted them. Since the pot has grooves, it was a bit harder to get the vinyl as smooth as I wanted.3.I picked out my acrylic paint and dabber and painted them like I would a stencil.4. I set it aside and let it dry for a few minutes and then carefully took off the vinyl. Now since the pot had grooves and I could not get the vinyl to lay as flat as I liked, I then had to go back with q-tips and clean up the outlines because some paint and gotten under the stencil and the lines were not as clean as I liked. I think I did an okay job. If I accidentally took too much off, I dipped the q-tip in the paint and gently dabbed it.5. I am going to let it dry overnight and them spray or coat with a clear coat so the paint is shiny.
Subscribe to:
Posts (Atom)


