


Just wanted to let everyone know that we have not abandoned you! Katie and I are taking a short break for the Holidays. We are in the processes of opening up a new Etsy shop under the name Crafting LT http://www.etsy.com/shop/CraftingLT
That way it will be easier to find. I have started putting up some adorable holiday barettes so go check them out. Big changes will be coming this next year so check here and always check our ETSY shop as things are always getting added.
Have a great Holiday and we'll see you in a few weeks!
Wednesday, December 16, 2009
Friday, December 4, 2009
Recipe Friday: Chicken Wreath
My good friend made this for our sewing night get together and it was awesome! I brought some home to my husband and he also loved it. It is a Pampered Chef recipe. I had to google the recipe and found it on What's Cookin, Chicago?

1/2 C. red bell pepper, chopped
1/2 C. broccoli, chopped (you can subsitute green bell pepper, which is how my friend made it. So good!)
1/4 C. water chestnuts, drained and chopped
2 T. onion, chopped
6 oz. cooked chicken breast, chopped
2/3 C. cream of chicken soup
1 C. (4 oz) shredded Cheddar cheese
2 (8 oz.) pkg. refrigerated crescent rolls
Preheat oven to 350ºF.
Chop pepper, broccoli, water chestnuts, onion and chicken. Combine all ingredients except crescent rolls in medium bowl.

Unroll crescent rolls and arrange triangles in a circle on a 15" baking stone with the bases overlapping in center and points toward the outside. Scoop filling mixture onto widest portion of each triangle. Fold points of triangle over filling and tuck under base at center. (Filling will not be completely covered.) Bake 25-30 minutes or until golden brown. Cut into wedges and serve warm.
You can also bake it on a cookie sheet, but it turns out the best on a baking stone. ENJOY!!

Chicken Wreath Recipe
1/2 C. red bell pepper, chopped
1/2 C. broccoli, chopped (you can subsitute green bell pepper, which is how my friend made it. So good!)
1/4 C. water chestnuts, drained and chopped
2 T. onion, chopped
6 oz. cooked chicken breast, chopped
2/3 C. cream of chicken soup
1 C. (4 oz) shredded Cheddar cheese
2 (8 oz.) pkg. refrigerated crescent rolls
Preheat oven to 350ºF.
Chop pepper, broccoli, water chestnuts, onion and chicken. Combine all ingredients except crescent rolls in medium bowl.

Unroll crescent rolls and arrange triangles in a circle on a 15" baking stone with the bases overlapping in center and points toward the outside. Scoop filling mixture onto widest portion of each triangle. Fold points of triangle over filling and tuck under base at center. (Filling will not be completely covered.) Bake 25-30 minutes or until golden brown. Cut into wedges and serve warm.
You can also bake it on a cookie sheet, but it turns out the best on a baking stone. ENJOY!!
Tuesday, December 1, 2009
Tutorial Tuesday
Boxed Flowers
This makes a great end of the year or Christmas gifts for teachers, grandparents, whoever. I helped my girlfriends make this for one of her daughter's student teachers. It was easy and is so cute. I am making them for my girls teachers at the end of the year.

1. You can use a flower box type basket, or if it just a few flowers you can use a cute flower pot.

2. This step was already done when we got it but, all you do is use a Cricut machine or handcut the flowers and the hot glue them onto the painted popsicle sticks.
3. We then circle cutted mats out of cardstock paper and pictures of the kids heads and glued them onto the flowers.

This is what the backs look like

4. Then you take foam or styrofoam blocks that you use for fake flowers and line the bottom and arrange the flowers in the foam.
5. We then found a cute matching ribbon and hot glued it all the way around and made a bow on the front.
6.Then we put the varsity letter stickers on the front.

7. Then we put brown crinkled paper to fill in around the flowers so the foam doesn't show and it looks more like dirt.
Tuesday, November 24, 2009
Tutorial Tuesday
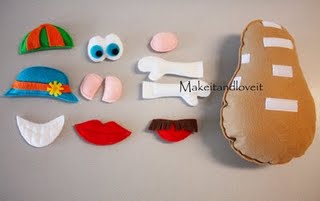
Felt Mr. Potato Head

I saw this on U Create and love it! I am going to make this during naptime today. This would make a cute Christmas present too!

Tuesday, November 17, 2009
Recipe Tuesday: Puffins :)
I love the Bakerella site. All the cake pops are so cute. I found this recipe on her site and we make it at least once a week. We call them Puffins (how cute is that?!)

Generously grease a 24 cup mini muffin pan with non-stick spray.
1 cup flour
1 teaspoon baking powder
1/2 teaspoon baking soda
1/4 teaspoon salt
2 tablespoons sugar
2/3 cup buttermilk*
1 egg
2 tablespoons pure maple syrup
2 tablespoons melted butter
1/2 cup milk chocolate chips
*I did not have buttermilk so I used this instead: Use one tablespoon of acid (lemon juice or white vinegar) for every cup of milk. Let stand for 5-10 minutes before using. Don't forget to measure out 2/3 cup!*
Let cool slightly and remove from the pan. You may need to use a toothpick around the edges to separate the pancake muffins from the pan.
Serve immediately with warmed butter if you like or even just with maple syrup.
Mini Maple Pancake Muffins

Generously grease a 24 cup mini muffin pan with non-stick spray.
1 cup flour
1 teaspoon baking powder
1/2 teaspoon baking soda
1/4 teaspoon salt
2 tablespoons sugar
2/3 cup buttermilk*
1 egg
2 tablespoons pure maple syrup
2 tablespoons melted butter
1/2 cup milk chocolate chips
*I did not have buttermilk so I used this instead: Use one tablespoon of acid (lemon juice or white vinegar) for every cup of milk. Let stand for 5-10 minutes before using. Don't forget to measure out 2/3 cup!*
- Preheat oven to 350 degrees.
- Combine flour, baking powder, baking soda, salt and sugar in a medium bowl. Sift together with a wire whisk.
- In another bowl, stir buttermilk, egg, maple syrup and melted butter until just combined.
- Add wet ingredients to dry ingredients and stir with a spoon until combined.
- Stir in chocolate chips. Reserve a few chips to sprinkle on the tops.
- Bake for 8-9 minutes.
Let cool slightly and remove from the pan. You may need to use a toothpick around the edges to separate the pancake muffins from the pan.
Serve immediately with warmed butter if you like or even just with maple syrup.
Looking fo new fonts to use??
I found this great site that has tons and tons of fonts! I love it. I have downloaded so many fonts and used them with my digital scrapbooking. Click on the link to go visit the site:


Friday, November 13, 2009
Round Robin with Amy

It is Round Robin time with Amy at Keeping up with the Schultz Family. Go check it out and you can link up too!
Our Round Robin post can be found here.

Thursday, November 12, 2009


Tuesday, November 10, 2009
Tutorial Tuesday
It is Round Robin time with Amy at Keeping up with the Schultz Family. Go check it out and you can link up too!
I know I am a little late, but it is still Tuesday for a few more hours. I saw this in Micheals with the Cruicut things and things you can make. I do not have the Cricut Expressions, only the original so I made do with what I had and ended up changing it anyway.
Since my family and I went to Disney World a month ago and my kids love looking at pictures of it I decided to make a mini photo album. The one that Michaels had was the same concept but for an Autograph book, which I may make for our Dinsey Cruise in the Spring.
What you need:
Cardstock, chipboard (or heavy cardboard), scissors,

1. Draw Circles for the Mickey on the chipboard or cardboard. I did the big circle at 6 1/2 " & the ears at 4"

2. Cut them out

3. Use your board template to make 4 from black cardstock, cut out 4
4. Adhere to front and back of the mickey Cardbaord.

5. Cut out 11 white cardstock cirlces just under 4"
6. Adhere 1 to the front of the black mickeys

7. Use your template and make 10 of these "hats"

8. Put the black hats on the 10 white circles, or you can put the white circles on the "hats" if you want more of the white showing.

9. Put all together and punch holes in everything. I used a crocodile punch to cut the holes.
10. Put the rings thru the holes

11. Decorate the front any way you want. This is what I put.
Sunday, November 8, 2009
The DIY Showoff Giveaway Celebration!!!

Roeshel at DIY Show off is having an awesome giveaway with lots of prizes. Click on the button and enter to win! I am so excited about this giveaway, because we are a part of it :) We are giving away this adorable skirt!!

Friday, November 6, 2009
Chicken Pomodoro
Ingredients
4 portions spaghetti (about 8 oz uncooked)
2 egg whites
4 tsp Mrs. Dash Tomato-basil-Garlic seasoning
1/4 cup reduced-fat Parmesan cheese, grated
4 portions chicken breat (about 1 lb)
2 tbsp olive oil
3 tomatoes, diced (or one 15-oz can)
1 green bell pepper, sliced
1 yellow bell papper, sliced
3/4 tsp Italian seasoning
4 tbsp red wine (or chicken broth)
Directions
1. Prepare spaghetti according to it's package directions.
2. In a medium mixing bowl, lightly beat the egg whites. In a pie plate, combine the Mrs. Dash seasoning and Parmesan cheese.
3.Dip chicken breast in egg whites then into the season Parmesan, coating both sides.
4. Heat olive oil in a large nonstick skillet over medium heat. Place chicken breasts in skillet; cover & cook for approx 6 min; turn & cook for 6 more min until no longer pink in the center. Transfer the cooked chicken breasts to a plate; cover with foil to keep warm.
5. Add tomatoes & bell peppers to skillet & saute over medium heat until the peppers begin to soften, approx 3 min. Stir in Italian seasoning & red wine (or chicken broth), continue to cook for 2 min.
6. Add pasta to the skillet with sauteed tomatoes & peppers; mix gently.
7. Slice cooked chicken. Divide pasta mixture into 4 portions, top with a portion of sliced chicken, serve and enjoy!
Thursday, November 5, 2009
Princess Tutus
I just finished making this tutu that was inspired by Sleeping Beauty. I used white ribbon instead of elastic for the waist. Amanda made the other Snow White tutu. She wrapped the elastic with blue ribbon. I think they turned out so cute!


My SIL sent me this site that has a shortcut on cutting tulle. It is awesome!!
Front

Back

Front

Back

My SIL sent me this site that has a shortcut on cutting tulle. It is awesome!!
Wednesday, November 4, 2009
We did it!

Tuesday, November 3, 2009
Tutorial Tuesdays: Lasy Day Skirts
I found this tutorial and love making these Lazy Day Skirts. They are easy to make and so cute. I also made matching shoes for two of the skirts that I made for my nieces. The tutorial can be found here: Lazy Day Skirt


Friday, October 30, 2009
Recipe Friday: Santa Fe Grilled Chicken Salad Wrap
This recipe is so yummy and is fast to make. It is a great dinner to make if you don't have any time to make dinner!

Ingredients
4 cups torn romaine lettuce
Santa Fe Grilled Chicken Salad Wrap

4 cups torn romaine lettuce
1 pkg. (6 oz.) OSCAR MAYER Southwestern Seasoned or Grilled Chicken Breast Strips (I have also used canned chicken)
1 large tomato, chopped
1 can (11 oz.) whole kernel corn, drained
1/2 cup Mexican Style Shredded Cheese
1/4 cup Ranch Dressing
1/4 cup Salsa
8 flour tortillas (6 inch)
Directions:
Toss romaine, chicken breast strips, tomatoes and corn in large bowl; sprinkle with cheese.Combine dressing and salsa. Pour over romaine mixture; toss to coat. Spoon evenly onto tortillas; roll up.
You can check out the recipe here at Kraft Foods: Chicken Wrap
You can check out the recipe here at Kraft Foods: Chicken Wrap
Thursday, October 29, 2009
Halloween Ribbon Wreath
I was looking for a cute Halloween tutorial to do this week and came across this really cool one. You can do it for any season or have one hanging year round. It is from The Long Thread blog about a year ago. Such a cute idea. Since it takes a lot of ribbon, try buying in bulk online rather than at the craft stores to make it alittle bit more inexpensive. Have fun and any finished projects, we would love to see pics!


Supplies:
12″ foam wreath form
24 yards 1 1/4″ black grosgrain ribbon (or less if using a wider ribbon)
Scissors
Measuring tape
Steps:
1. Cut 45-50 16″ pieces of ribbon.
2. Tie one strand of ribbon in a knot around the wreath. I used a “messy knot” — right over left, then right over left again, pulling in the opposite direction. It doesn’t really matter how you do it as long as you are consistent all the way around. Repeat with the knots, pushing them close together, until you fill the wreath.
3. Cut one long piece of ribbon (48″) and tie one end to form a knot. Leave a long loop for hanging and tie another knot onto the wreath.
4. Trim any frayed or long ends.
Friday, October 23, 2009
Recipe Friday: Sweet Dinner Rolls
My sister introduced me to this awesome homemade roll recipe. It is so easy to make and so good!!

Ingredients:
1/2 cup warm water
1/2 cup warm milk (I don't warm up the milk. I just use it cold)
1 egg
1/3 cup butter, softened
1/3 cup white sugar
1 tsp salt
3 3/4 cups all-purpose flour
1 (.25 ounce) package of active dry yeast
1/4 cup butter, softened
Directions:
1. Place water, milk, egg, 1/3 cup butter, sugar, salt, flour, and yeast in the pan of the bread machine in the order recommended by the manufacturer. Select Dough/Knead and First Rise Cycle; press Start.
2. When cycle finishes, turn dough out onto a lightly floured surface. (I do not put any flour down. I think it makes the dough taste floury). Divide dough in half. Roll each half into a 12 inch circle, spread 1/4 cup softened butter over entire round. Cut each circle into 8 wedges. (like cutting a pizza) Roll wedges starting at wide end; roll gently buy tightly. Place point side down on ungreased cookie sheet. Cover with clean kitchen towel and put in a warm place, let rise 1 hour. Meanwhile, preheat oven to 400 degrees F.
3. Bake in preheated oven for 10 to 15 minutes, until golden.
And enjoy :) You can check out the actually recipe here: Sweet Dinner Roll Recipe
Sweet Dinner Rolls

Ingredients:
1/2 cup warm water
1/2 cup warm milk (I don't warm up the milk. I just use it cold)
1 egg
1/3 cup butter, softened
1/3 cup white sugar
1 tsp salt
3 3/4 cups all-purpose flour
1 (.25 ounce) package of active dry yeast
1/4 cup butter, softened
Directions:
1. Place water, milk, egg, 1/3 cup butter, sugar, salt, flour, and yeast in the pan of the bread machine in the order recommended by the manufacturer. Select Dough/Knead and First Rise Cycle; press Start.
2. When cycle finishes, turn dough out onto a lightly floured surface. (I do not put any flour down. I think it makes the dough taste floury). Divide dough in half. Roll each half into a 12 inch circle, spread 1/4 cup softened butter over entire round. Cut each circle into 8 wedges. (like cutting a pizza) Roll wedges starting at wide end; roll gently buy tightly. Place point side down on ungreased cookie sheet. Cover with clean kitchen towel and put in a warm place, let rise 1 hour. Meanwhile, preheat oven to 400 degrees F.
3. Bake in preheated oven for 10 to 15 minutes, until golden.
And enjoy :) You can check out the actually recipe here: Sweet Dinner Roll Recipe
Thursday, October 22, 2009
Tutus, Tutus, Tutus
Just wanted to put up some tutu's I have been working on. You can do so many differnt variations and they are great for so many things, Halloween, dance, dressup, or just because. Check out our Etsy shop to get your own or have one custom made!


Tuesday, October 20, 2009
WE ARE BACK!!!
I know it has been longer than anticipated but we back and better than ever! We have so many new products in our ETSY store, so please check it out. We will be adding lots more in the months to come. We have shifted our store to feature more kids items like onsies, tutu's, skirts, and more.
Since it is Tuesday and we have missed out tutorial, we will pick that up next week but will do our Recipe Friday again. We have also decided to do tutorials on different things not just crafts to help make it more interesting for everyone.
Here are a few pics of the new things in our store:


Subscribe to:
Posts (Atom)